

Synopsis
This post is a basic introduction for my journey into macOS executable reverse engineering with Ghidra and Lief. This article comes - beside the theoretical descritption - with a tutorial and example project which should provide you with the basic skills to start your own adventures in the land of macOS reverse engineering. Please keep in mind, that this topic is for informational and educational use only. Reverse engineering a copyright protected application might most likely be illegal in your country - depending on where you live.
Problem description
Some times you might run in a situation where you want to be able to amend a existing exectuable on macOS and extend or edit its behavior.
Table of content
- Example projects
- Tools of trade
- Description of macOS executable file format
- How to disassemble a macOS app
- How to debug a macOS app
- How to patch a macOS app
- How to add a section and new code to macOS app
- How to inject own library to macOS app
- Tutorials (see: Example projects)
- Credits
Example projects
Here you can find the final sample projects with their source code which we use in the following articles and tutorials. If you like, you can download the final apps here, but all the app can also be built by going through the tutorials in this article.
IMPORTANT: Your browser might block this download for security reasons. If you really want the files, you might want to copy the link and download the file manually after confirming the security message. Or use right-click and Save As…
- hello_world sample project
- lib4injection.dylib sample library
- hello_nasm sample project
hello_world example
Tools of trade
Here you have a list of (mostly) free tools which you need for file analysis, disassembling, debugging and modification. This list is by no means complete, but it should provide you with a basic overview of what comes in handy when you seriously want to start reverse engineering macOS apps, executables and libraries. With the tools in this list you should be able to follow this tutorials and recreate them on your own. Please feel free to contact or send me an update for this list of tools when you think you have a important amendment and / or addition.
Debugger and Disassembler
- Free debuggers and disassembler
- XCode - Extensive development IDE for macOS and iOS
- Ghidra
- Official website
- Github repo
- Homebrew: brew install –cask ghidra
- radare2 - Free extensive reverse engineering toolkit
- Official website
- Github repo
- Homebrew: brew install radare2
- Commercial debuggers and disassembler
Hex editor
- Hex Fiend
- Official website
- Apple App Store
- Homebrew: brew install –cask hex-fiend
File editor / modification
- Lief - Library to Instrument Executable Formats
Assembler code compiler
Misc tools
- XCode commandline tools (XCode)
- otool - object file displaying tool
- nm
- clang
- gcc
- lldb (gdb)
- Calculator
Description of macOS executable file format
Mach-O file format description
Executables and libraries on macOS use the so called Mach-O file format. In this sections you will get infos about the structure of the Mach-O file format, how to do modifications and an introduction of some internal aspects of the format.
Mach-O file structure
A mach-o file primarily consists of 4 sections: A header, a load command table, a padding section and a raw content section for the code and resources like strings and such. Here you see a rough scheme of the structure of the mach-o file format.
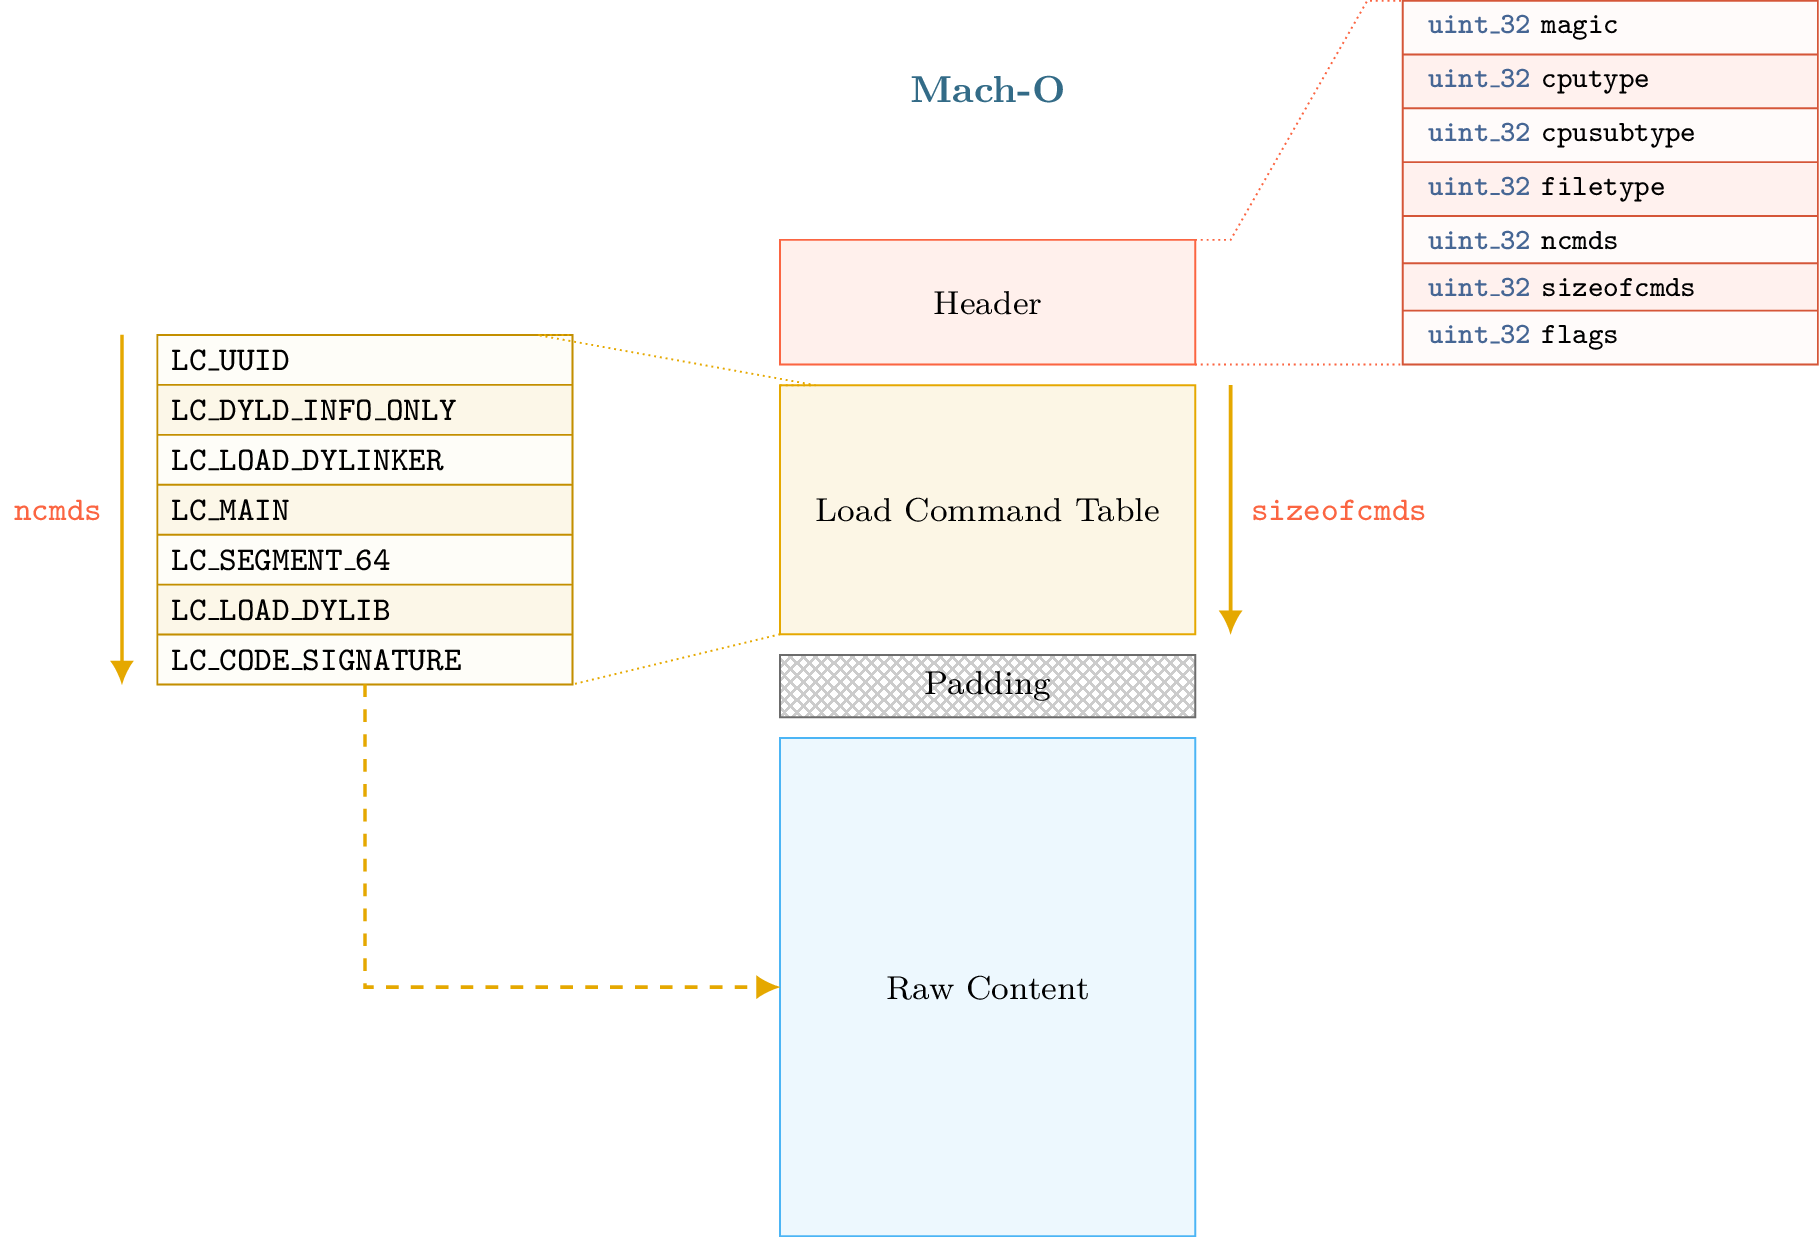 (Source: Lief Documentation)
Header section
The header section contains base information about the mach-o file and is something you should look at first. The infos about the app are:
- The CPU type it’s compiled for
- The CPU subtype
- The File type
- The number of commands
- The size the commands need
- Some flags
- A magic number
- The magic number for 32-bit code is 0xfeedface
- For 64-bit architectures it is 0xfeedfacf
Load command table section
The load commands are read immediately after the Mach-O header.
The Mach-O header tells us how many load commands exist after the Mach-O header and the size in bytes to where the load commands end. The size of load commands is used as a redundancy check.
When the last load command is read and the number of bytes for the load commands do not match, or if we go outside the number of bytes for load commands before reaching the last load command, then the file may be corrupted.
Padding section
The padding section is used by OSX to sign the binary after the compilation by adding a custom command. The codesign utility extends the raw data area with the signature and adds a LC_CODE_SIGNATURE or a LC_DYLIB_CODE_SIGN_DRS command in the padding area.
Raw content section
The raw content consists of the assembly code, rebase bytecode, signature, strings etc. This is the glue of the app and where you can find the code flow and functionalities.
Mach-O file structure inspection with Lief
If you’d like a detailed overview of the mach-o file structure of the executable your inspecting you can use Lief (see in Tools of trade) and run the following python script to print the information about the app to the console. Just create a python script file in the same directory where the hello_world executable resides, copy & paste the follwing python code into the script file and run the script from the console
1
2
3
import lief
app = lief.parse("./hello_world")
print(app)
Output
The output of the Lief-script should look something like this:
1
2
3
4
5
6
7
8
9
10
11
12
13
14
15
16
17
18
19
20
21
22
dave@Aeon c % python3 get_info.py
Header
======
Magic     CPU Type  CPU subtype    File type      NCMDS     Sizeof cmds    Reserved  Flags
MAGIC_64  x86_64    3              EXECUTE        12        458            0         NOUNDEFS DYLDLINK TWOLEVEL PIE

Commands
========
Command : SEGMENT_64
Offset  : 20
Size    : 48
__PAGEZERO     0              100000000      0              0              0              0              0              0
Sections in this segment :

Command : SEGMENT_64
Offset  : 68
Size    : 188
__TEXT         100000000      4000           0              4000           5              5              4              0
Sections in this segment :
	__text           __TEXT           100003c90 168       3c90      4         REGULAR                       0                   0                   0         0         0         SOME_INSTRUCTIONS PURE_INSTRUCTIONS
	__stubs          __TEXT           100003df8 18        3df8      0
...
Mach-O file structure inspection with otool
As an alternative to Lief you can also use the otool command line tool which comes with Apples XCode already installed. otool is a really valuable yet basic and simple app that comes free and is able to retreive a wide range of information about a mach-o executable or library.
It can even decompile an executable / library altough the output is very rough and simple (but it does the job). How ever if you want to deeply analyze a disassembly of a file you might be better off with a higher level kind of disassembler, just because of the limitation the console comes with.
1
2
3
4
5
6
7
8
9
10
11
12
13
14
15
16
17
18
19
20
21
22
23
24
25
26
27
28
29
30
31
32
33
34
35
dave@Aeon c % otool hello_world
Usage: /Applications/Xcode.app/Contents/Developer/Toolchains/XcodeDefault.xctoolchain/usr/bin/otool [-arch arch_type] [-fahlLDtdorSTMRIHGvVcXmqQjCP] [-mcpu=arg] [--version] <object file> ...
	-f print the fat headers
	-a print the archive header
	-h print the mach header
	-l print the load commands
	-L print shared libraries used
	-D print shared library id name
	-t print the text section (disassemble with -v)
	-x print all text sections (disassemble with -v)
	-p <routine name>  start dissassemble from routine name
	-s <segname> <sectname> print contents of section
	-d print the data section
	-o print the Objective-C segment
	-r print the relocation entries
	-S print the table of contents of a library (obsolete)
	-T print the table of contents of a dynamic shared library (obsolete)
	-M print the module table of a dynamic shared library (obsolete)
	-R print the reference table of a dynamic shared library (obsolete)
	-I print the indirect symbol table
	-H print the two-level hints table (obsolete)
	-G print the data in code table
	-v print verbosely (symbolically) when possible
	-V print disassembled operands symbolically
	-c print argument strings of a core file
	-X print no leading addresses or headers
	-m don't use archive(member) syntax
	-B force Thumb disassembly (ARM objects only)
	-q use llvm's disassembler (the default)
	-Q use otool(1)'s disassembler
	-mcpu=arg use `arg' as the cpu for disassembly
	-j print opcode bytes
	-P print the info plist section as strings
	-C print linker optimization hints
	--version print the version of /Applications/Xcode.app/Contents/Developer/Toolchains/XcodeDefault.xctoolchain/usr/bin/otool
If you want to get the load commands with otool you can do something like this:
1
2
3
4
5
6
7
8
9
10
11
12
13
14
15
16
17
18
19
20
21
22
dave@Aeon c % otool -l hello_world
hello_world:
Load command 0
      cmd LC_SEGMENT_64
  cmdsize 72
  segname __PAGEZERO
   vmaddr 0x0000000000000000
   vmsize 0x0000000100000000
  fileoff 0
 filesize 0
  maxprot 0x00000000
 initprot 0x00000000
   nsects 0
    flags 0x0
Load command 1
      cmd LC_SEGMENT_64
  cmdsize 392
  segname __TEXT
   vmaddr 0x0000000100000000
   vmsize 0x0000000000004000
  fileoff 0
...
How to disassemble a macOS app
How to debug a macOS app
How to patch a macOS app
How to add a section to a macOS app
How to inject a library into a macOS app
Example projects / tutorials
Patching macOS app (with Ghidra)
For the tutorial about how to patch a macOS executable I use a small c app with a prompt asking the user to enter his secret and displays an appropriate message after checking the input. If the user doesn’t enter the corret secret he will get an error. The goal of this tutorial is to patch the app in a way the user allways gets the success message, no matter if the secret is correct or not. We could also disable the whole prompt and check functionality, but for simplicity and for you to get the big picture, at this moment it’s enough to just patch the check away. So let’s dive in.
Create a simple CLI executable with C
Here you have my version of a simple app written with C and compiled on a MacBook Air M1 with Apple Silicon Chip (ARM64 Architecture).
Write the source file
Open your Text editor of choice (I use Sublime 3) and create a new file, copy paste the following source code and save the file as hello_world.c
1
2
3
4
5
6
7
8
9
10
11
12
13
14
15
16
17
18
19
20
21
22
23
24
25
26
27
28
29
30
31
32
33
34
35
36
37
38
39
40
41
42
43
44
// Standard include
#include <stdio.h>
// For scanf()
#include <curses.h>
// For strcmp()
#include <string.h>

int main() {

  // Variable to hold the user input
  char input[256];

  // The secret to check against the user input
  char hardcoded_string[] = "S3CR3T";

  // This msg will prompt the user to enter his secret
  printf("Please enter your secret: ");

  // Will wait for user input and store the input in the variable "input"
  scanf("%s", input);

  // Compare the value of the variable "input" with the variable "hardcoded_string"
  int result = strcmp(input, hardcoded_string);

  // If the compare of the two values succeeds (or not) show a appropriate message
  if (result == 0) {
    printf("#=========================================================#\n");
    printf("|                       SUCCESS !!!!                      |\n");
    printf("|                                                         |\n");
    printf("|      Welcome to the hidden spot of this app. Enjoy!     |\n");
    printf("|                                                         |\n");
    printf("#=========================================================#\n");
  } /*else if (result < 0) {
    printf("The input string is less than the hardcoded string.");
  } */ else {
    printf("#=========================================================#\n");
    printf("|                        ERROR !!!!                       |\n");
    printf("|                                                         |\n");
    printf("|       The entered secret does not match, try again      |\n");
    printf("|                                                         |\n");
    printf("#=========================================================#\n");
  }
  return 0;
}
##### Compile the source file to an executable To compile the source code to an executable we use clang which is part of the “XCode command line tools” compilation. To check if clang is installed you can run:
1
2
dave@Aeon c % which clang
/usr/bin/clang
If you get an error you might be missing the “XCode command line tools”. Download XCode from the Apple App Store and / or use the following command in a terminal to install the “XCode command line tools”
1
dave@Aeon c % xcode-select --install
With clang installed you can use the following command in a terminal to compile the source “hello_world.c” into an executable. Notice: We create an executable with x86_64 architecture, more about that and why later. As you can see we have to include the “curses” library this is needed for the scanf() call.
1
dave@Aeon c % clang -target x86_64-apple-macos -arch x86_64 -o hello_world hello_world.c -lcurses
Make the file executable
By default the compiler produce an executable which should be ready to go. But, if your file is not an executable after compilation, you might need to change its rights accordingly. Use the following command to change its access rights:
1
dave@Aeon dev % chmod u+x hello_world
CodeSign the executable
On macOS an executable can be code signed to verify the origin / author of an app. This is a security meassure that Apple introduced to make sure an app is not tampered with alien code and released from a verified author. Saying that it makes the task of reverse engineering harder but not impossible. You can remove and / or replace an existing signature with your own. Read more about Apple code signing here
To create a valid signing certificat two options, you can create a self signed certificate. This is valid only for running the app on your local machine. To create a trusted certificate for others to use your app you need a Apple developer Account and create a certificate in the Apple developer console.
Even if it’s not needed for this tutorial example to code sign your executable you can do so, to play around with the differences between codsigned and unsigned apps. To code sign your executable hello_world app run the following command:
1
dave@Aeon dev % codesign --verbose=4 --timestamp --strict --options runtime -s "<YOUR SIGNING CERTIFICATE NAME>" hello_world --force
Run and test the executable
After successfully creating and signing (or not) the app it’s time to test our work and see if it does what we want and see how the app behaves really. Run the following command to execute the app:
1
2
3
4
5
6
7
8
9
10
11
12
13
14
15
16
17
dave@Aeon dev % ./hello_world
Please enter your secret: Test
#=========================================================#
|                        ERROR !!!!                       |
|                                                         |
|       The entered secret does not match, try again      |
|                                                         |
#=========================================================#
dave@Aeon dev % ./hello_world
Please enter your secret: S3CR3T
#=========================================================#
|                       SUCCESS !!!!                      |
|                                                         |
|      Welcome to the hidden spot of this app. Enjoy!     |
|                                                         |
#=========================================================#
dave@Aeon dev %
If all went ok, you’ll see some output like above. The app correctly checks the user input and after the validation shows an appropriate message to the user. So far so well. But now what about if we lost the secret and really need to get the app to enter the secured app state. This is where code patching comes in play.
Disassemble your example app
Firts part of every reverse engineering task is most likely always disassembling the app to analyse its functionality and find out how and where the interessting part happens that we want to amend.
For this tutorial I used Ghidra because it’s free and has a option to edit the assambly and export a amended and fully working executable. But of course you can use your own disassembler of choice. Let’s see how the example app looks like in machine code.
Address of Entry Point
A important and very interessting location in a executable is always the entry point. This is where the program begins execution. If you let Ghidra analyze your test app and the analization process finishs you will be taken automatically to the entry point of the app.
This location is particularly interessting because from here you can start tracing your app till you find the sweet spot you’re looking for and the action happens. Also on the other hand it’s sometimes necessary to change the entry point to your own injected / amended code or make a jump to somewhere else in the app or a library you injected.
Because our example hello_world app is really simple and our complete logic happens in the main function, which is the entry point of the app, this is also the spot we’re interessted in. So let’s go to the entry pont of hello_world and see what the code looks like.
Ghidra main view
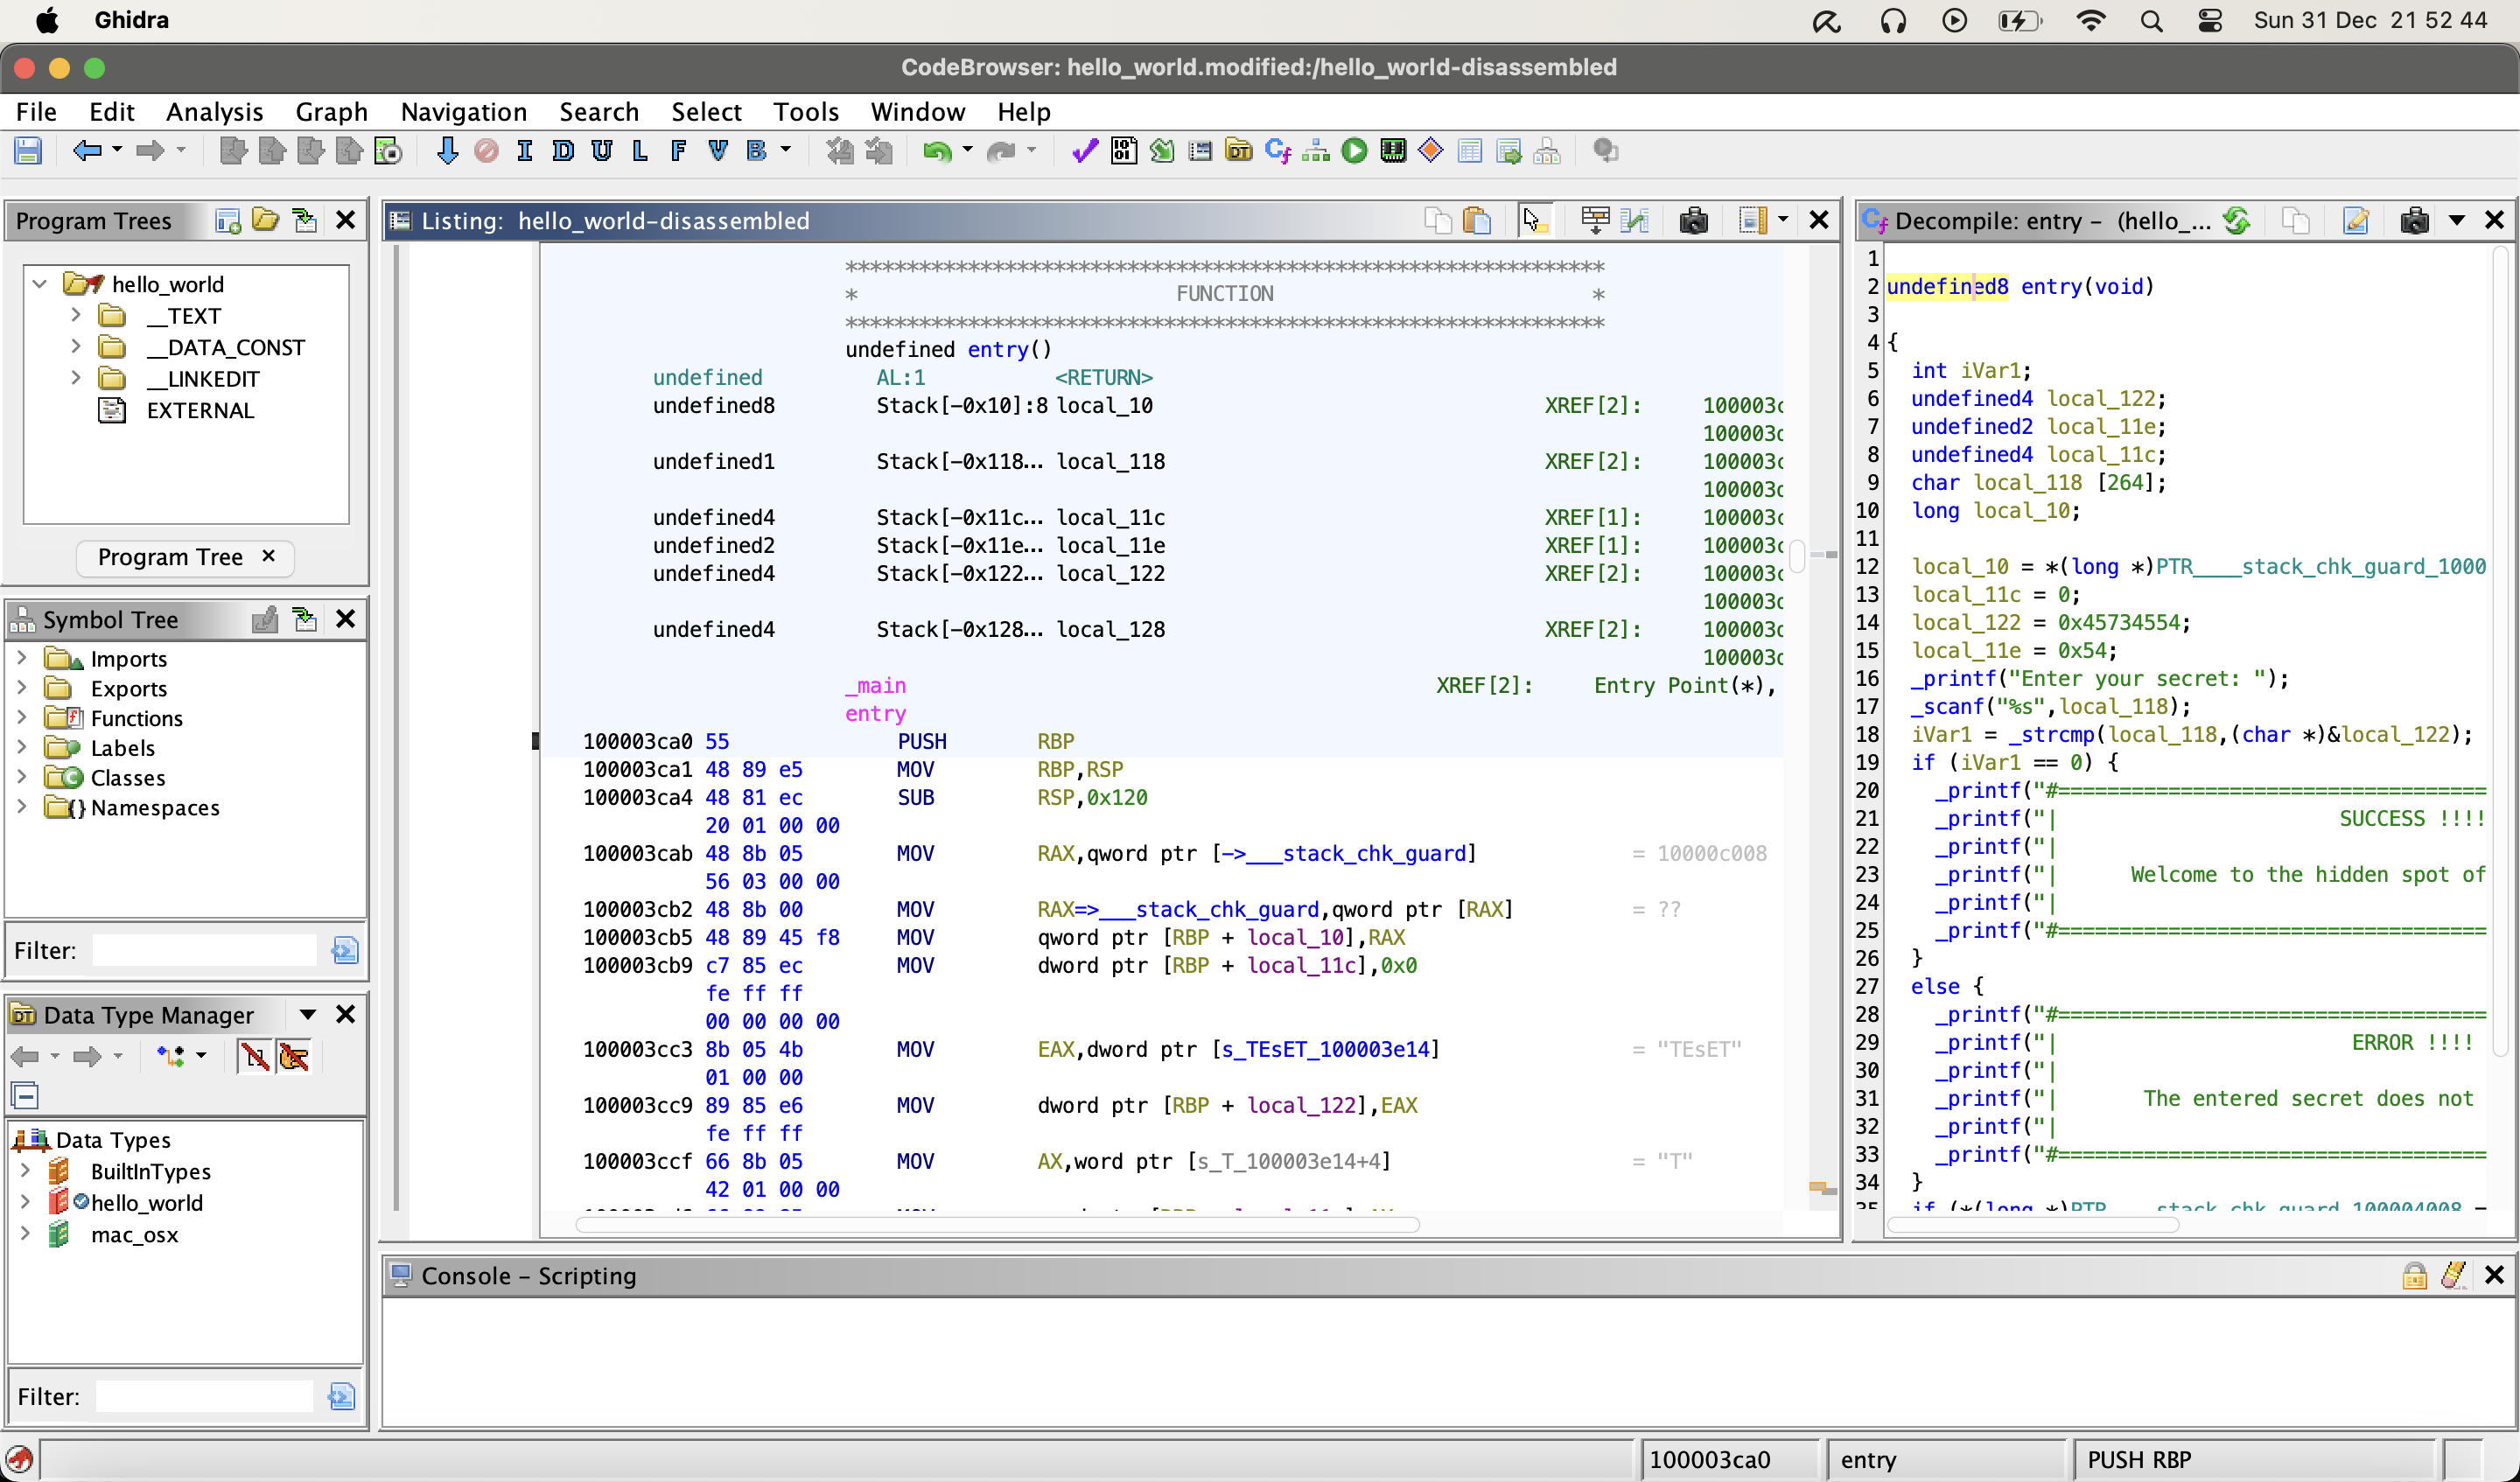
Ghidra - pseudo code
Another reason why Ghidra is very handy is its aibility to show pseudo code. This is an already recreated pseudo c source code for the assambly which was disassembled by Ghidra. Of course this feature is also available with other disassemblers, but keep in mind, that Ghidra is really free and also used by a wide community world wide and therfore well maintained. 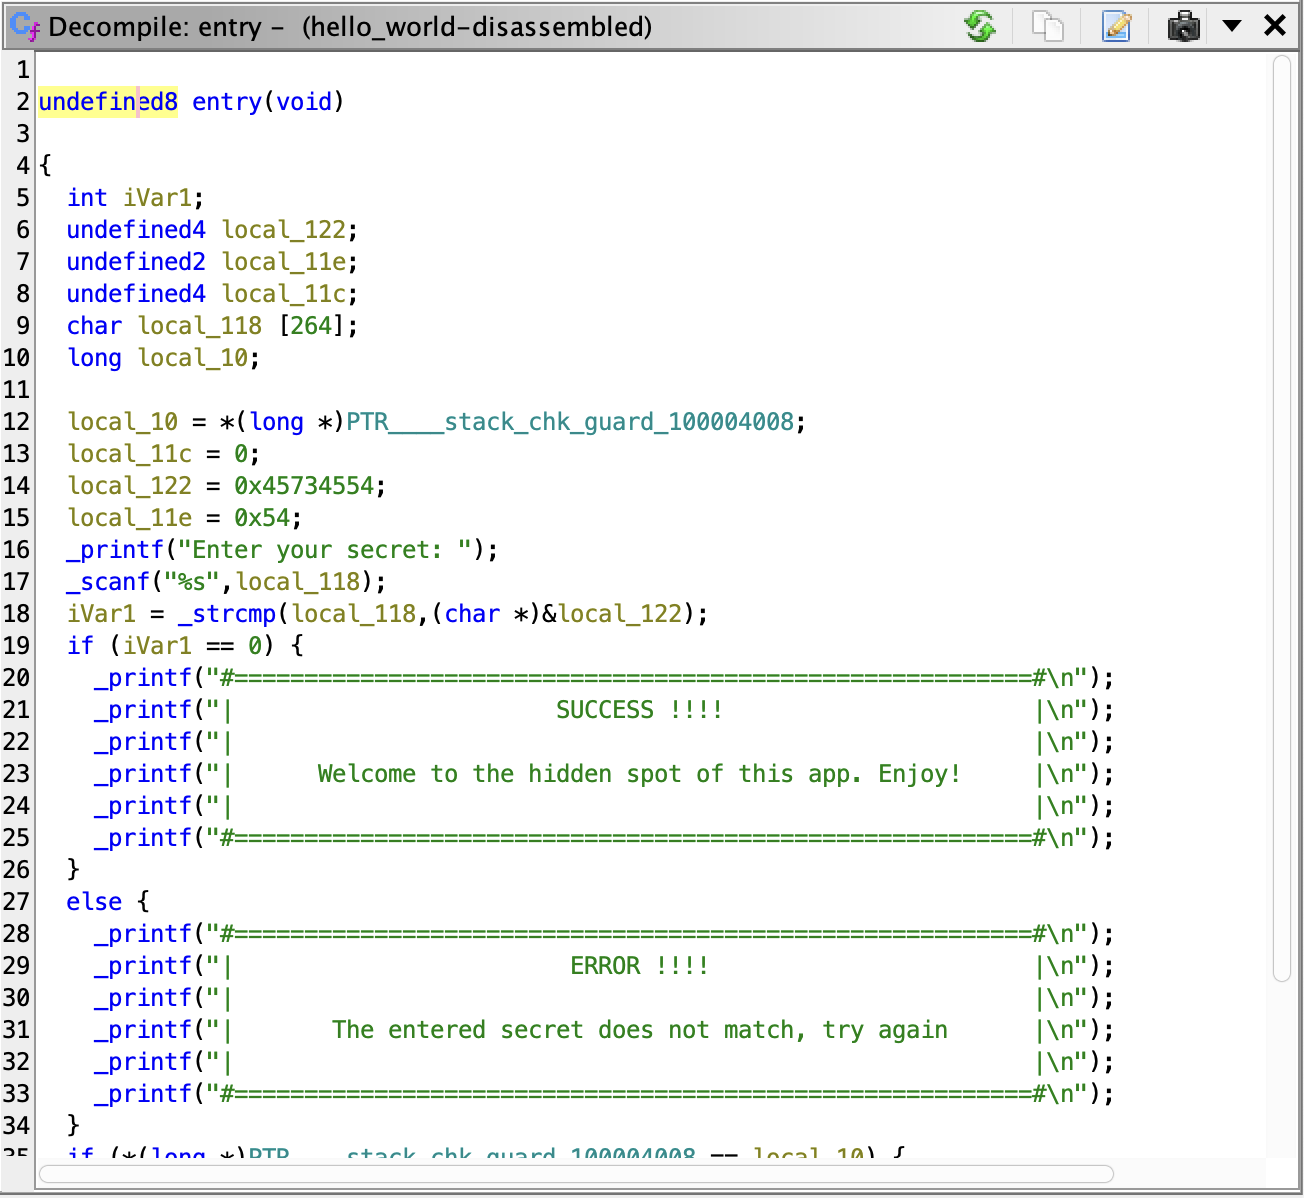
Injecting library into macOS app (with Lief)
For this tutorial we can reuse the hello_world app as a target or create a new simple CLI executable. This is up to you, I’m going to use the unpatched version of the hello_world app we created in the previouse tutorial about patching an app.
Adding section to macOS app (with Ghidra)
Credits
- Lief project - Library to Instrument Executable Formats
- Mach-O Wikipedia